The nail art trends keep updating every season and the trends for this season are here! From what products to use to how to achieve the perf nail art results, get to know everything here!
13 Nail Art Trends for Fall 2018
1. Embossed Nails

You Will Need:
1. Magpie nail color
2. PNP Clear acrylic powder
3. Nail art detailer brush
How to Proceed
1. Apply 2 thin even coats of your base color.
2. Then one layer of the top coat. It’s best to have gel polish in thin layers than flooding it.
3. Cure every layer for 60secs each. This will leave a tacky residue, make sure you wipe it off before you start with your design.
4. Take blobs of the nail paint on the brush and place it and taper it to form the petals of the rose.
5. While the paint is wet, sprinkle some clear acrylic powder and cure it for 60 secs.
6. Powder off the excess powder nicely to achieve matte embossed nails.
2. Holographic/ Chrome Nails/ Gigi Hadid Met Gala Nails

The chrome nails are super edgy and basically looks like a mirror on your nails. So, you can carry your makeup mirror with you everywhere.
You Will Need
1. OPI gel color in black onyx or OPI gel color in alpine snow
2. Eyeshadow sponge
3. Nicole Dairy nail chrome pigment
4. Nail Brush
How to Proceed
1. Start off with two opaque layers of black or white gel polish to get a multidimensional or silver chrome look, cure in between each layer.
2. Then add a layer of no wipe top coat and cure that again for another 30 secs. Now your base is ready.
3. Going in with the mirror powder, load the applicator with a lot of product and start buffing the powder into the nails just a tad bit of pressure.
4. Keep buffing and working that powder until you get that absolute mirror finish you are looking for!
5. Seal the look with a top coat.
Quick tip: Brush off the excess from the nails before you put the top coat because the excess powder will make the nails look glittery and take away from the mirror finish. You could also recreate this look a little differently by changing the base color to play around with the chrome tones.

3. Minimal Negative Space
This nail art is super simple to start off with to slip into the nail art trend!
You Will Need:
1. Ellement CO. – Just a minute gel in any color of your choice.
2. Mishare base coat
How to Proceed
1. Apply a base coat on the nails and cure them.
2. Then apply a reinforcement gel and place your nail art charm and cure them.
3. Paint a layer of your choice of color a little over half the nail. And finish it off with a matte top coat and cure. Wipe off the inhibition layer that you get after curing the nails.
4. Half and Half French Mani

If you are bored of the classic French tip and want to add some quirk to your nails then this is one of the perfect nail art trends for you.
Products You Need
1. Sally Hansen miracle gel in royal splendor
2. Sally Hansen game of chromes for a metallic accent
3. Ciate London mani marker
How to Proceed
1. Start with a peachy pink base.
2. Then draw out the French tip with acrylic first, in white. Paint an opaque layer of the color of your choice but go only halfway with this one and then continue it with the other color.
3. Be sure to be accurate with the lines and not have shaky hands with this one.
4. Complete the look with a thin layer of top coat after the other layers are dry to hold everything in place.
5. Mix of Texture
Incorporate a hint of sophistication and class to your everyday look with this nail art. One of the best nail art trends that is perf for parties and weddings.
Things Needed
1. Ysl inspired Tuxedo nails
2. Ysl No 6 Terriblement Noir Nail Polish Duo
3. MAC Matte Overlacquer
How to Proceed
1. Two coats of base color polish work best for this. Make sure its dry or till you know it’s not sticky.
2. Then run a layer of matte top coat on your glossy tips, to keep it from chipping. Try to do the next coat with a very light movement to avoid eventual smudges.
3. Glide some clear polish or black glossy polish along the tips of your nails to form a half moon.
4. Once that’s dry, you are ready those flaunt those glossy tips. You can decorate your nails with a combo of matte and glossy polishes in different patterns and designs to get your desired look.
6. Tweed Nails

Take layering to a whole new level this winter by bringing your fashion foot forward with some winter style inspired tweed nails.
Products You Need
1. Inglot Nail Laquer ( colors to match the fabric you choose to replicate)
2. Cosmetic Fan Brush
How to Do
1. Start with two coats of black nail lacquer and cure in for 30 secs each coat.
2. Then dip just the tips of a fan brush into the white nail polish and swipe across the nail forming horizontal lines. Cure for 30 secs.
3. Use the same brush and run it through the length of the nails forming vertical lines. Repeat the same process with white polish first and go in once again with grey polish, but this time around make sure you have very less product on the brush. Cure Between each layer for 30 secs.
4. This will give the texture and fell of a tweed fabric. You can flaunt it as is to really get the feel of the fabric or finish it with a thin coat of clear polish to complete the look.
I would totally recommend going without the top coat.
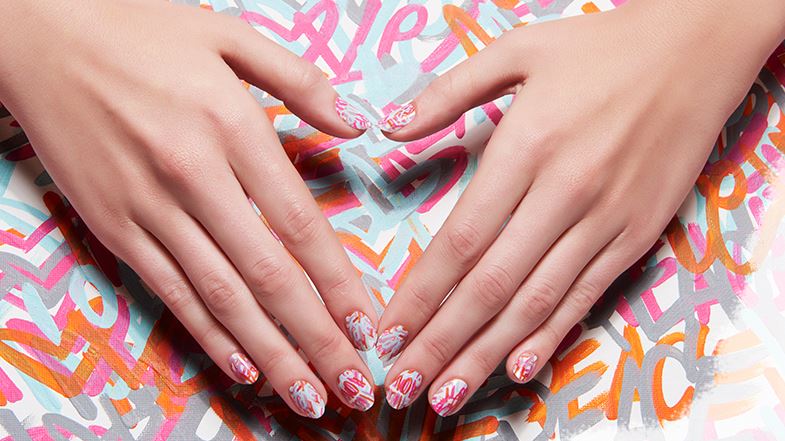
7. Grafitti Nails

This is one of the most trending nail art trends! Let the Picasso in you take over and use your nails as a blank canvas and start off with the first intimidating stroke by splashing in some cool colors and making your nails a total masterpiece.
Products You Need
1. Sally Hansen Triple Shine
2. Nail Art Detailer Brush
3. Sally Hansen Triple Shine Top Coat
How to Proceed
1. Prep your nails with a base coat.
2. Coat your nails with two thin layers of a solid color.
3. Pick out an inspiration design and try to replicate the same with a nail art pen.
4. Draw some arrows, words and ink splatter to create the graffiti effect.
5. Keep an eye out for shadows and highlights to give the nail art a 3-dimensional outcome. Fill in the blanks with some bricks.
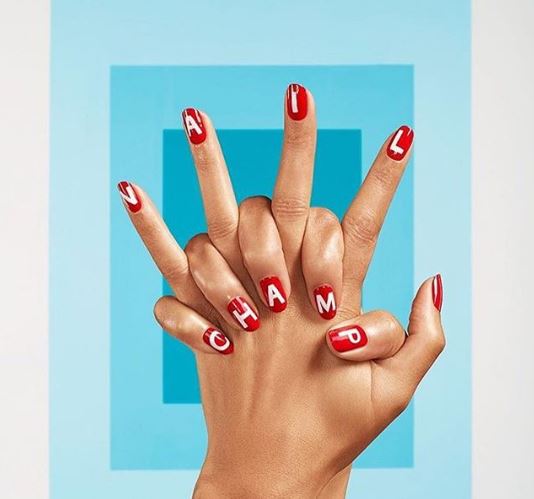
8. Monogram Nails

Take matters into your own hands this season a little too seriously as monogram nails is one of the trendy nail art trends.
Products You Need
1. Kensington caviar
2. Essie
3. Vinyl Decals
How to Do
You could do this with bare nails to make the nail art look simple yet stand out. There are no set rules, So you can casually swipe two coats of any color polish across your nails. Pick out the letter you want to work with and start doing. Pick it up with a cuticle stick or tweezer and position onto your nail. Position the alphabets right where you want them to be, smooth down the letter with your fingers. Make sure it stays in place and apply a coat of top coat. And there you have your designer nails.
9. Sporty Stripes/ Essie Polo Stripes

You will need
1. Striping Brush
2. 4 colors of Nail Polish
3. A bowl of Nail polish remover
4. Essie Licorice
5. Essie big spender
6. Essie candy apple
7. Essie Muchi Muchi
How to Proceed
1. Coat your nails with Essie muchi muchi as base coat, and kick-start your nail art.
2. Keep a bowl of nail polish remover in a bowl near you handy.
3. You will need a striping nail art brush to do perfect stripes.
4. Once the base dries, dip the brush in licorice polish and carefully draw out a thin straight line across the length of the nail.
5. Follow the same steps for each of the colors until you get the desired effect. Do three stripes of three colors at different angles in every nail to create an element of interest. Make sure it stays in place and apply a coat of top coat. And there you have your designer nails.
Tip to remember – Use colors which already have some transparency in them to get great Tip: Use the darker shade in the middle to make the other colors pop. Seal with top coat. You can choose any color of your choice for this one and it’ll look just as cool.
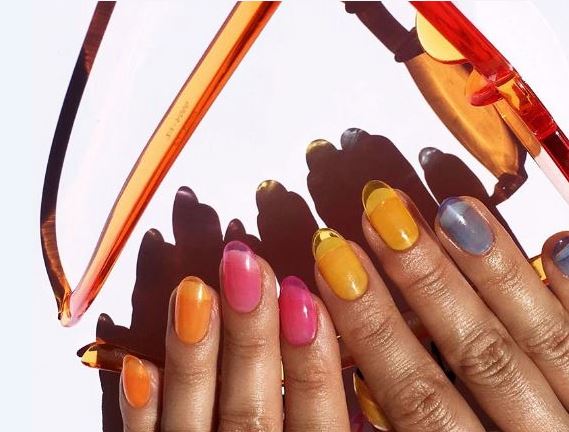
10. Jelly Nails

This is one of the nail art trends that is colorful, vibrant and young all at the same time. This Nails Trend is sure to take you back in time with all the 90’s vibes. Just the perfect Nail art for Spring Summer.
Smith & Cult Above it all Top Coat
Chanel Le Vernis Nail Color
Jelly Nails aka glass nails can be clear or colored with a see-through effect. You will need to have a clear acrylic nail tip for this manicure. Mix a few drops of top coat with just a little bit of your choice of Nail color. The more color you add the more intense it gets. Make sure you do not add much of results
Sheri and Nail Job Marble tint
Soak Off Top Coat – RNK
Combine a few drops of top coat with just a tad bit of the marble tint. Paint your nails an even layer of the polish with very light pressure on the brush to avoid any streaks and cure. Paint as many layers till you’re happy with the transparency. Finish the look with a top coat.
Idea Vetro – stained glass paint
INM Out the Door Top Coat
Melange of top coat with the stained glass paint. Go ahead and paint, cure and seal.
Tip: Start with just a little bit of the stained glass paint see the color pay off and add if required.
11. Logo Nails

Recreate some of the most iconic logos of all time with nail art. Combine fashion with the creative goddess to result in something absolutely freaking stunning.
Products You Need
1. Christian Louboutin Nail Lacquer
2. Madam Glam Matte Top Coat
3. Sugar Top Coat
4. Nail Art Detailer Brush
How to Do
Pick out the brand you want to do the nail art of. Use the reference image and replicate as close the possible the same design of the brand. You can create a bit of a variation by doing the alphabetical logo on one nail, their brand print on another and a solid color on the other and so. Also, choose between matte and glossy polishes to go with the feel of the brand.
Tip: Accuracy is key.
12. Charm Nails

Spruce up your manicure with some tassels. These danglings are a definite statement-making accessory to your everyday looks and one of the best nail art trends.
Products Needed
1. Neatly done acrylic nails.
2. Nail Drill
3. Plyer
4. Charm
5. Ring
You can add these to absolutely any nail art. Drill a hole in your nail bottom up, to make sure you do not damage your skin underneath. Take baby steps with a small drill and confidently upgrade to the bigger drill.
Here’s the tricky part, Open the ring put your charm in it and gently slip it into the piercing and close it carefully without chipping the nail with the help of a plyer.
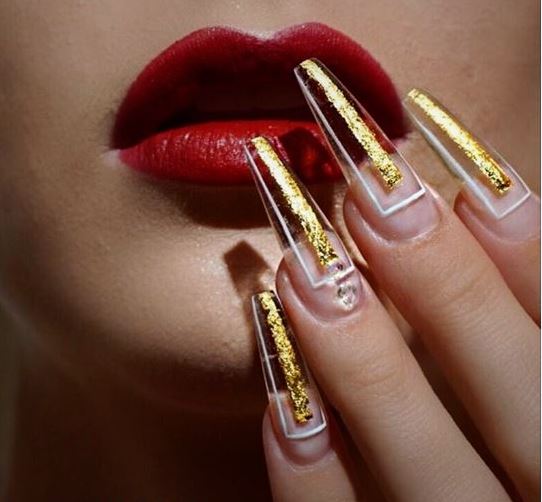
13. Gold Leaf Nails

Bejewel and bespangle with fancy foil nail art trend. Sway this way with richer colors and reflections.
Products You Need
1. Givenchy Intense Color Nail Lacquer
2. Inglot Iconic Gel
You can achieve this look with both nail polish as well as gel polish. You can use this as an accent to a solid color or do a full nail with foil and keep the rest of the nails simple.
How to Do
1. Start with painted nails, with a thin coat of top coat, carefully place your gold leaf with tweezers and firm it down with your fingers.
2. Push the foil with a wooden stick into your edges and cut off the excess.
3. Definitely Seal the deal with a top coat.
4. Another way to style these foil nails, rip the gold leaf into small irregular pieces and place those pieces on your nail wherever required to form your design.
5. Make sure you press it down make it flat on the nail.
Tip: Choose jewel tones hues like emerald and sapphire to make the nail art pop. picturesque nails.
So, this is all about nail art trends. Which trend did you like the most! Do let us know by tweeting @shilpa1ahuja.
Read next
– Fashion Nails: All the Latest Nail Art, Color and Shape Trends!
– Latest Nail Art Designs | Top 9 Nail Art Trends for 2017
– 9 Unique and Beautiful Trends in Nail Art for 2017
– 10 Beautiful Black Nail Art Designs to Try Right Now!
– Beautiful Nails at Home with Our Natural Manicure Guide

Shazia Bargathullah is a regular freelance writer at ShilpaAhuja.com. She is also a fashion design graduate from iNIFD. Her journey started with a keen visual eye, an interest in styling and a passion for design. She has an expertise in modest fashion and writes about makeup tips, beauty trends and runway-inspired fashion ideas. She is also the author of the blog Devil Wears Parda. For comments and feedback, please email [email protected].

Loved this article! Please do nail color trends for fall.